Monday, April 30, 2012

30 Days of Pinterest: Day 30

Woo! Day 30. I managed to stick with it! I wanted to try today’s methods out on my own kitchen but fortunately it was never too dirty. So when I got the chance to clean someone else’s, I decided I’d try some of the baking soda tips I'd read here and here.

This is what the cooker hob looked like before.

DSC03033

When mixing up the baking soda, I added just enough water to make a thick paste. Then I spread on the hob and left for about 15 minutes before scrubbing off. This was the results!

DSC03040

Now, it does require some elbow grease to get the tough parts off but this has honestly worked better than any other products I’ve used. So when I moved onto cleaning the shower, I decided to try it there. Instead of making a paste, a just sprinkled the baking soda in the shower and scrubbed with a just damp sponge. This was a half way through shot, the right side you can see is nice and clean!

DSC03037

I also used it to unblock the drain, put the baking soda down the drain and followed with some vinegar. The result is a fizzing that helps unclog the drain. I also used it in the sink as well. I still have some cleaning to do so I’m sure I’ll find some more uses for it!

A nice side by side picture!

beforeandafter

30 Days of Pinterest: Day 29

I really wasn’t in much of a mood to do anything today but figured I couldn’t give up, what with being so close to the end! I decided to look through my Nails board as it seems like doing my nails is something I’ve really enjoyed from this challenge.

So I remembered I got some sponges in my Essence Marble Mania Nail Art Kit and decided to give some gradient colouring a go. It was the best results but with some practice I think I’d get to like it! I got the inspiration from this website.

DSC03023

A rainbow effect,didn’t really go as planned though!

DSC03024

A gradient pink look. First finger on the left I used the sponge with the nail polish freshly loaded, the other two fingers I didn’t reapply the polish so it looked much lighter and speckledy. Which I liked. In hindsight,I should have put the middle shade on top.

DSC03028

I decided to try it with glitter. I think I like this one the best.

It was interesting, I think I would try it again but with a make up sponge like in the original pin. I think because it’s a ‘denser’ sponge or something it would be better. Have you ever tried it?

Saturday, April 28, 2012

30 Days of Pinterest: Day 28

Today I knew I wanted to bake. And I knew I wanted to use up the bananas I had. I have two recipes pins. The first is by The Novice Chef Blog with her Banana Dream Cake. The second is by The Lady Behind the Curtain with her Caramel Banana Cake Roll. Both look and sound so delicious but when I looked at the ingredients and the methods, I decided I didn’t have some the ingredients and didn’t fancy going to get them. So I decided to make my own cake!

DSC02999

Banana and Butterscotch Cake with Cream Cheese Frosting

Ingredients

2 eggs

1/2 cup sugar

1/2 cup vegetable oil

2 ripe bananas, mashed

1 cup of plain flour

1/4 teaspoon baking powder

1/8 teaspoon baking soda

Butterscotch sauce (or caramel sauce)

Frosting

220g Philadephia or any cream cheese, softened

55g butter, softened

125g Icing sugar

Vanilla Essence

Method

1. Preheat oven to 180°C (350°F). In a bowl, whisk the eggs together for about 5 minutes until frothy. Add the sugar and whisk until incorporated.

2. Add the oil and stir to mix. Add the mashed bananas and mix until smooth.

3. Sift in the flour, baking powder and baking soda in 2 or 3 step, folding in with a spatula or wooden spoon until mixed. Add to two pre-greased baking tins and bake for about 10-13 minutes, until the centre is cooked.

4. Allow to cook in to pan for 5 minutes until transferring to cool on a wire rack.

5. To make the icing, mix the cream cheese and butter together until smooth. Add a few drops of vanilla essence and mix in. Finally sift in the icing sugar in steps, stirring with a wooden spoon or spatula to incorporate.

6. To decorate, sandwich the cakes together with some icing (squeeze some butterscotch sauce on the icing before sandwiches together)  and then ice the top of the cake. Decorate with sprinkles (I used caramel flavoured ones) or some slices of dried bananas if you like. You can squeeze some more butterscotch sauce on the top if you like.

Ok, I have no pictures at the moment as I’m rushing to put this together, clean the house, finish eating dinner, get ready for the night and go out! But I will cake pictures tomorrow and edit!

The cake was yummy, not as dense as banana bread but more airy. The icing is slightly tart but it suits the cake and the butterscotch sauce as a bit of more sweetness to the cake. I'd definitely make this again!

DSC03002

DSC03005

Sprinkles close up!

DSC03013

30 Days of Pinterest: Day 27

We’re so close to the end of this 30 Days project! I started following Sorted Foods in Pinterest recently and when they pinned this recipe for a homemade chicken burger, I knew I had to make it before the week was over! I made one for my boyfriend the way it’s described in the video but the one I made for myself was the regular way with egg and flour.

DSC02995

Homemade Chicken Burgers (2 different methods)

Ingredients

Chicken breasts

Red or green pesto (I used green as I had it on hand but in the original recipe they use red) [this is only for pesto burger]

1 bowl with flour in it and 1 other bowl with a whisked egg in it [for the non-pesto ‘classic’ burger]

Breadcrumbs

Salt, pepper and any other seasoning you’d like

Oil

Method

1. Place the chicken breast between two pieces of cling film. Using your palm or a rolling pin, flatten on the breast until it is half the original thickness (be careful though because if you are too heavy handed, you will tear holes through the meat).

2. For the pesto burger: Using your hands (or a spoon but hands are better) coat both sides of the chicken breast with pesto. Coat evenly with breadcrumbs. Season with a bit of salt and pepper (I also used a small sprinkling of chilli flakes).

3. For the classic burger: Dip and coat the breast evenly in the flour bowl. Then dig and coat evenly in the egg bowl before transferring to the breadcrumb bowl where you will, yes you guessed right, dip and coat evenly! Season with salt, pepper and any other seasoning of your choice.

4. Place a frying on the heat and add a glug of oil. When the pan is hot enough, add the chicken breast. I think a medium-high heat is best here, not too high though as you might burn the chicken). When that side is nice and golden, flip over and cook the other side. Cook until it has cooked through entirely (I cut mine in half as I wanted to ensure it was cooked properly inside).

5. Serve whichever you want to! With a burger bun, between some nice bread or just on it’s own would be perfectly fine. I served mine with some fresh French Loaf with Edam cheese and ketchup, along with creamy cheese potatoes and sweet corn.

DSC02996

Thursday, April 26, 2012

30 Days of Pinterest: Day 26

I own stacks of make up. LOADS. I love it, but I don’t wear a huge amount of it. In fact, I rarely use it. I don’t really during the day (unless I’m feeling particularly crap about myself then I might lash some on). Even when going out I tend to favour a toned down look.

I also love looking at make up tutorials on YouTube. At times I’ve tried them out but I’m a bit rubbish at it. None the less, I scoured through some of my favourite beauty gurus on YouTube the other day and went on a pinning spree. Today I decided to try out a smokey day time look by Ask Me Makeup. I love all the looks Amy does and I wish she would post more often as the way she films is stunning.

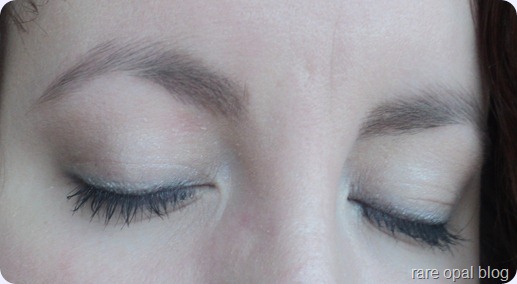
Anyway, here’s my take on that look!

DSC02983

Full face shot with flash

DSC02986

Close up of eye with flash

DSC02982

Close up with no flash

DSC02977

Close up with no flash

DSC02974

No flash

I was impressed with the results. When I first put it on, I thought the black liner was a bit harsh but once blended it’s not so bad. I think a brown would be better for a day time look though. It’s subtle but adds a bit of definition which I like. I also think this look would be easy to bring to an evening look by adding some dramatic liquid liner.

Here’s how to do it!

all numbered

1. As this is a smokey look, I’d suggest doing your eyes first before doing your base, it will help at the end as it can get messy and you won’t have to fix your face.

2. Apply an off white to the entire lid of the eyes. Then apply an eyeshadow base

3. Apply the same off-white just below the eyebrows (1).

4. Apply a light taupe (or a colour a shade or two darker than your natural skin tone) to the crease and on the eyebrow bone (2). Blend well. This step is to add slight definition to the eyes without adding too much colour.

5. Take a nude shimmer of your choice and apply it evenly to the entire lid (3)

6. Using a soft black (or brown) eye pencil, run along your lash line and lower lash line (4). Depending on how dramatic you want the look, you can make the line as thick or as thin as you like. In the video the lower waterline is also lined but I don’t like doing that on myself. Smudge the line outwards with a flat angled brush or a cotton bud to take away any harsh lines. Then to set the liner, run a small bit of matt black along the line.

7. Take the same nude shimmer and run it from the inner corner of your eye to about 3/4 of the way out (so just below the number 2 in the picture) and blend in. This will help take the a bit of the edge of the eye liner and make it blend in a bit more. Do the same with the lower lash line.

8. Using a dark brown, bring it from the outer corner of the eye (where your liner ends) up to the crease and blend inwards for about 1/4 of the eye (5). Make sure it is blended well.

9. Finish your eyes by curling the lashes and applying 1 or 2 layers of mascara (I used black but again I think brown would be good for day time).

10. Apply your base, concealer, a natural blusher and slick neutral lip balm or lip gloss.

And you’re done! And here’s a list of products for anyone interested.

Base- No.7 Beautiful Skin BB Cream in Fair for Normal/Oily Skin

Concealer- Soap and Glory Kick Ass Concealer in Light

Eyeshadow Primer- Catrice Stay On

Off White Shadow (1)- Essence Soft Matt Eyeshadow in 01 Velvet Passion

Taupe Colour (2)- No.7 Aniversary Eye Trio Fabulous 40s (light brown shade)

Nude Shimmer (3)- Sleek iDivine Bad Girl Palette (2nd shade on the top left)

Eyeliner (4)- Opia Eyeliner in Black (Penney’s/Primark)

Matt Black Eyeshadow (4)- MUA in Shade 20 Matt

Darker Brown (5)- No. 7 Anniversary Eye Trio Fabulous 40s (darker brown shade)

Mascara- Maybelline Full n Soft in Black

Blusher- Maybelline Dream Touch Blush in the Peachy Shade (can’t seem to find a shade name or number!)

Highlighter- Benefit High Beam

Bronzer- Essence Bronzing Compact Powder Matt in 02 Love to Be Matt (used to contour a bit)

Lip Gloss- Bourjois Rose Exclusif in 01 (this one changes colour due to the pH of you lips)

30 Days of Pinterest- Day 25

The other day I picked up the Essence Marble Mania Nail Art kit. It contains 1 nail art brush (just what I need!), 2 sponges and 2 wooden sticks. The wooden sticks are used for water marbling nail polish. It’s something I’ve wanted to try for a while and had pinned from Hey, Nice Nails blog. And here’s the results!

DSC02954

Left hand

DSC02961

Right hand

I think it’s a fun idea, I wanted to try out some new colours I had bought during the week so I stuck with a neon theme (instead of trying the pastels again!). The results are very ‘Big Fat Gypsy Wedding’ish! I would try it again but with different colours. Here’s how I did it.

1. Fill a glass or bowl with warm or room temperature water (make sure it’s not too cold or else the nail varnish will seize a bit and it won’t work).

2. Prepare your nails with a base coat that is opaque (I used two thin layers of white but you can use another colour. Though I think white is best as it’s so neutral). It’ll give a better result, help the pattern come out clearer.

3. Tape around your nails (sides and above the cuticles). This will help make clean up a lot easier.

4. Once your ready, open the lids to all the polishes you want to use. It’s better to have all the lids open so you can work faster.

5. Drop the colours in the order you wish in concentric circles (so like creating ripples with a stone in a pond). I used 5 colours but you can use less and repeat a few times. Using the stick (or toothpicks), drag it through the polish to create swirls and designs.

6. Place your nail on top of the water, making sure it’s completely submerged. Wait for 10-20 seconds for the polish to dry (blowing in it will make it happen faster).

7. Using the stick, drag it around the outline of your fingernail to gather it all up (once the polish is dry, it will have the same sort of consistency as that manky milk skin you get when you overheat milk). Take your nail out of the water.

8. Repeat for all the nails. Once dry, remove the tape and top with a topcoat. Clean up around nails with nail varnish remover.

These are my favourites

DSC02954

 DSC02961

Here’s the colours I used, in order of what I dropped in first.

Missguided Summer Splash Nail Polish in MissChievious

Essence Colour & Go in Lime Up!

Essence Colour & Go in C’est La Vie!

La Femme Beauty in Ultra Yellow

No. 7 Stay Perfect in Me! Me! Me!

Top coat- Sally Hansen Insta-Dri

Wednesday, April 25, 2012

30 Days of Pinterest: Day 24

There’s always loads of bananas left at my Mother’s house and I used to often use them up as banana bread. When I was there the other day, I noticed there was some that needed using up so I took them home with me. Not wanting to use them for my usual banana bread, I looked through Pinterest for ideas. And found a recipe for Roasted Banana Honey Nut Muffins from Curly Girl Kitchen.

DSC02944

Roasted Banana Honey Nut Muffins

Ingredients

2 ripe bananas

1/2 cup of honey

2 tbsp vegetable oil

1 egg

1 tsp vanilla extract

1 cup plain flour

1/2 tsp baking powder

1/4 tsp baking soda

1/4 tsp salt

1 tsp cinnamon

1/2 cup chopped walnuts (though the original uses almonds)

Method

1. Preheat oven to 200°C (400°F). Roast the bananas for about 20 minutes. They will go a bit black and mushy inside but that’s ok! It’s supposed to happen. Reduce oven to temperature 180°C (350°F)

2. Leave the bananas to cool until you can handle them. Peel and mash in a bowl. Add the honey, oil, egg and vanilla and whisk to mix together.

3. In a separate bowl, sift together the dry ingredients (flour, baking powder, baking soda, salt and cinnamon). Add the walnuts too to coat (so they won’t sink to the bottom).

4. Add the dry ingredients to the wet ingredients a few tablespoons at a time and mix until just moistened.

5. Fill into cupcake cases and bake for about 15 minutes. If you decide to make bigger muffins, then bake for about 20 minutes.

6. Allow to cool in pan for 5 minutes before transferring to cool on a wire rack.

You can eat them warm or you can eat them like I did with some chocolate spread!

DSC02949

Testing out my new nail art pens earlier

They’re very moist and the taste is different to the banana bread I usually bake. I’d say they’d be yummy with almonds so next time I think I will make them like that!

DSC02946

Related Posts Plugin for WordPress, Blogger...